Taking videos between the hours of dawn and dusk is pretty challenging; it has next-level perks, too. After creating a natural ambiance according to the feeling you want to induce in your story, you’ll need proper lighting to bring a lively vision.
The lighting conditions during nighttime shoots could leave you stumped regarding proper exposure. Likewise, there are many things you need to do to make your nighttime photos and videos shine.
Here are a few tips for such twilight adventures –
Use a Dedicated Night Shooting Capable Camera
A normal camera won’t work for you in extremely dark scenarios. There are some dedicated cameras meant for nighttime shooting.
So, look for some full-spectrum Night Vision Camcorders to capture videos and pictures at night. But there are various options, so choosing the best one could be challenging. The referred article will help you to decide which one to buy.
Set the Camera at a Lower F-Stop
It’s a simple fundamental. We can see better in the low-lit situations only when the pupil in our eyes gets expanded. Similarly, the camera’s aperture is the hole or gap through which the light enters.
The lower F-stop means a wider opening. It allows more light to enter. So, it would be wise to use a lens that allows wide-open shooting at an f/1.2-f/2.8 aperture value. Choosing a fast lens will assist you in shooting with faster speed.
Set the Camera at a Higher ISO
Generally, professionals push their ISO up to 3200 while using a full-frame DSLR camera and at 1600 ISO for a crop sensor body.
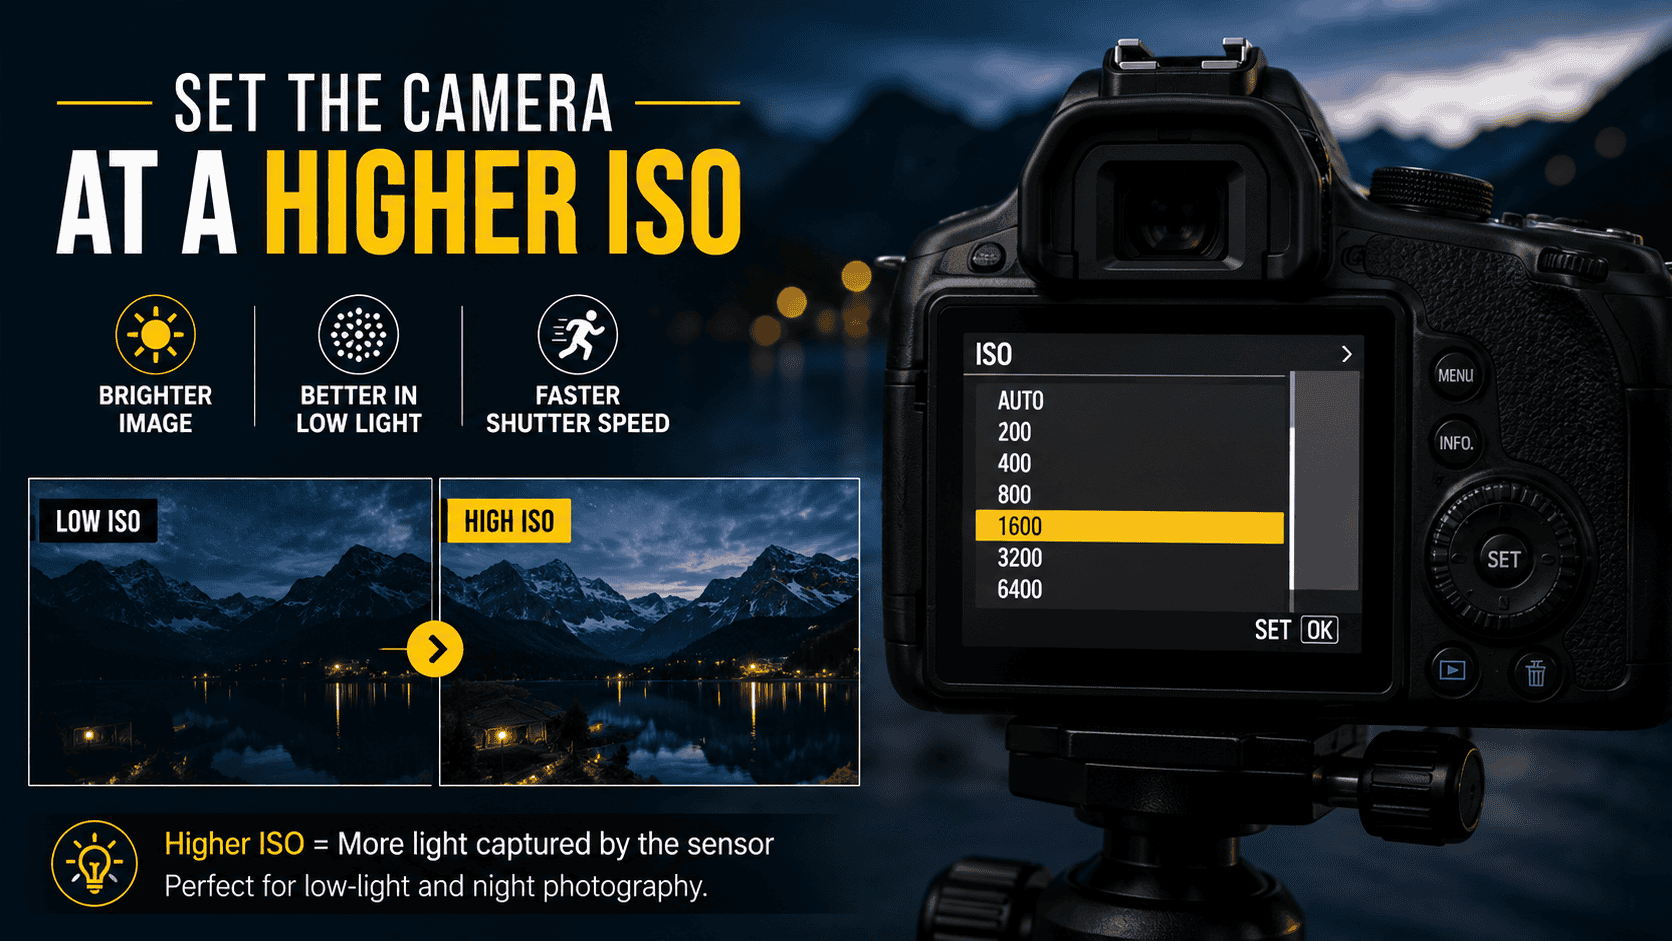
Keep in mind, low ISO values could make your image dark but include less noise. Similarly, the high ISO range makes your image relatively brighter, but there will be a high chance of getting relatively more grain.
The ISO value mentioned above does not add much grain to the picture. But every situation is different. So experiment a lot with different settings and go only with the settings that make you the happiest.
Reduce Noise in Post Production
You can repair the footage a little or sometimes a lot during post-production. The most common editing software, like Adobe Premiere Pro or Final Cut Pro, offers a few premium and free versions of noise reduction plug-in options.
After running such a plug-in on the footage, you won’t get the same result as an original noise-free video or picture, but you’ll likely see some improvements.
Slow Down the Shutter Speed
Slowing down the camera’s shutter speed could cause blurry motion, but allow more light to enter. Generally, we use a shutter speed of 1/60th of a second in normal lighting conditions.
The shutter speed of 1/30th of a second in low light can create magic. When you reduce the shutter speed two times, a double amount of light will enter the camera.
Reduce the Frame Rate
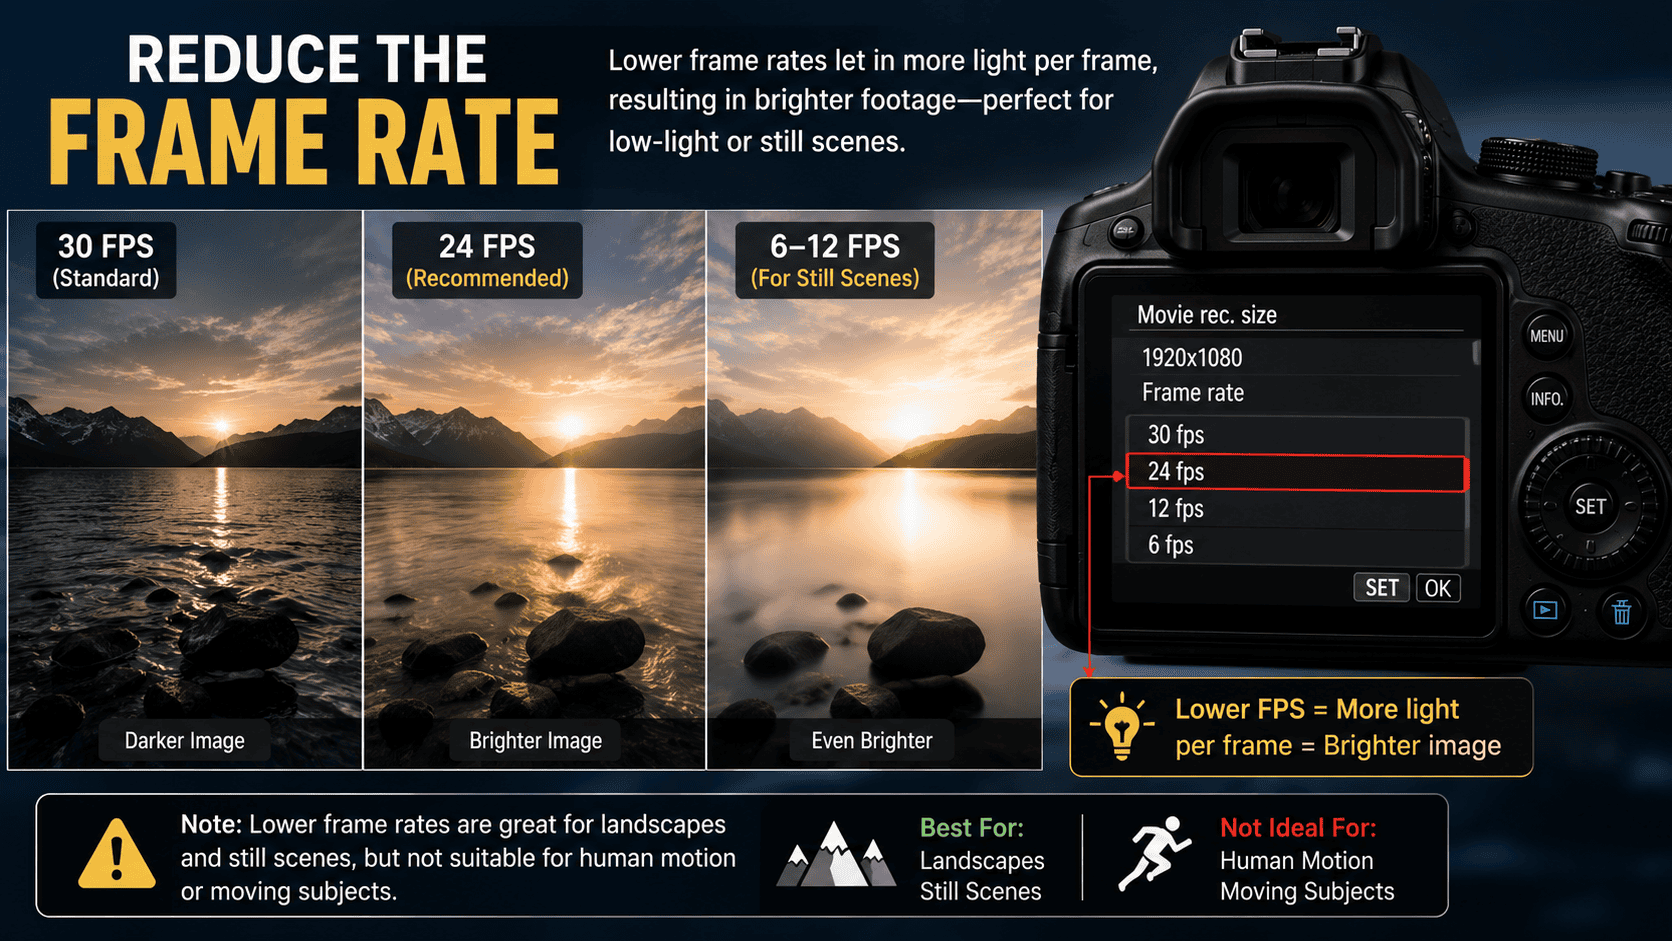
Instead of using the most common 30/sec frame rate, use 24 frames per second to brighten your image. You could even shoot at 6 to 12 frames per second by leaving the shutter off for landscape or something that stays fairly still. Keep in mind, it won’t work for human motion or movable subjects.
Set the Camera in Manual Mode
The auto mode is genuinely beneficial for run-and-gun shooting. When it comes to showing your creativity, it would be better to get yourself trained in the manual mode.
The automatic mode helps focus on things in no time, but it never gives you full control over the composition aspects. The post-processing season could be frustrating for you when dealing with color temperature.
Using the camera in manual mode, you can customize everything as per your shooting needs, even the quick access button and dials.
Maintain a Distance between Camera and Subject
You may notice the subject going in and out of focus while shooting in dark situations. The reason is that the depth of field becomes super small while you shoot wide-open. If the subject moves just one or two inches, the camera will lose focus.
To overcome this, give yourself a little more space and move back a bit and see the magic. The focusing will be super easy.
Plan in Advance
If possible, shoot a scene using your mobile phone before starting the shoot. This footage will help you decide the proper exposure, wide-open shooting looks, etc.
So, you will not unnecessarily take much time on the day of shooting to adjust the frame or to figure out the way of reducing grain.
Plan during shooting what kinds of things you can deal with afterward. If you get a manageable grain level while shooting with a high ISO range to brighten the scene, go with the flow without worrying about the noise.
Conclusion
Now you’re all set to keep going with the night stories to perk your portfolio up. Aside from these tricks, I told you to find good locations with impressive ambient street lights to cut out the reflection or shadow and ease the shooting process.
Using external light by following lighting rules could ease your job. If the external light makes the scene harsh, you can soften the tone using the filter or in the post grading session. This is just a small last piece of advice.
Thanks for reading the article. I hope this guide will help you become a pro in this field. I wish you a happy night shooting and a great day!


Share Your Views: